I choose to finish my dinosaurs by painting. “Beauty is in the Eye of the Beholder”. You have many options.
- Leave “As Is” – Natural. Depending on the condition when adopted, you may have many years before rust creates serious damage. I would recommend a clear coat (flat, gloss or high gloss) to reduce the speed of deterioration from rust. Your Home Improvement Center Specialist can provide suggestions for other materials. Just Ask!
- Wire Brush. After removing the loose rust with wire brushes, seal as recommended above.
- Acid Wash & Rinse. You may like the look after the acid wash and wish to use a sealer at this step.
- Rust Converter. Rust converters act as primers, by sealing the rust. The one I used provided a flat black coating to the entire dinosaur (see Pterodactyl slide show in the “How to Gallery” page). A “Scary Kool” look! Than seal with appropriate material(s) for extra protection.
- Have Fun, be Creative. Select your Colors. After wire brushing, acid wash, rinsing wash, rust converting and primer – Go For It with Color!
We will discuss Wire Brushing, Acid Washing & Rust Converter in this step.
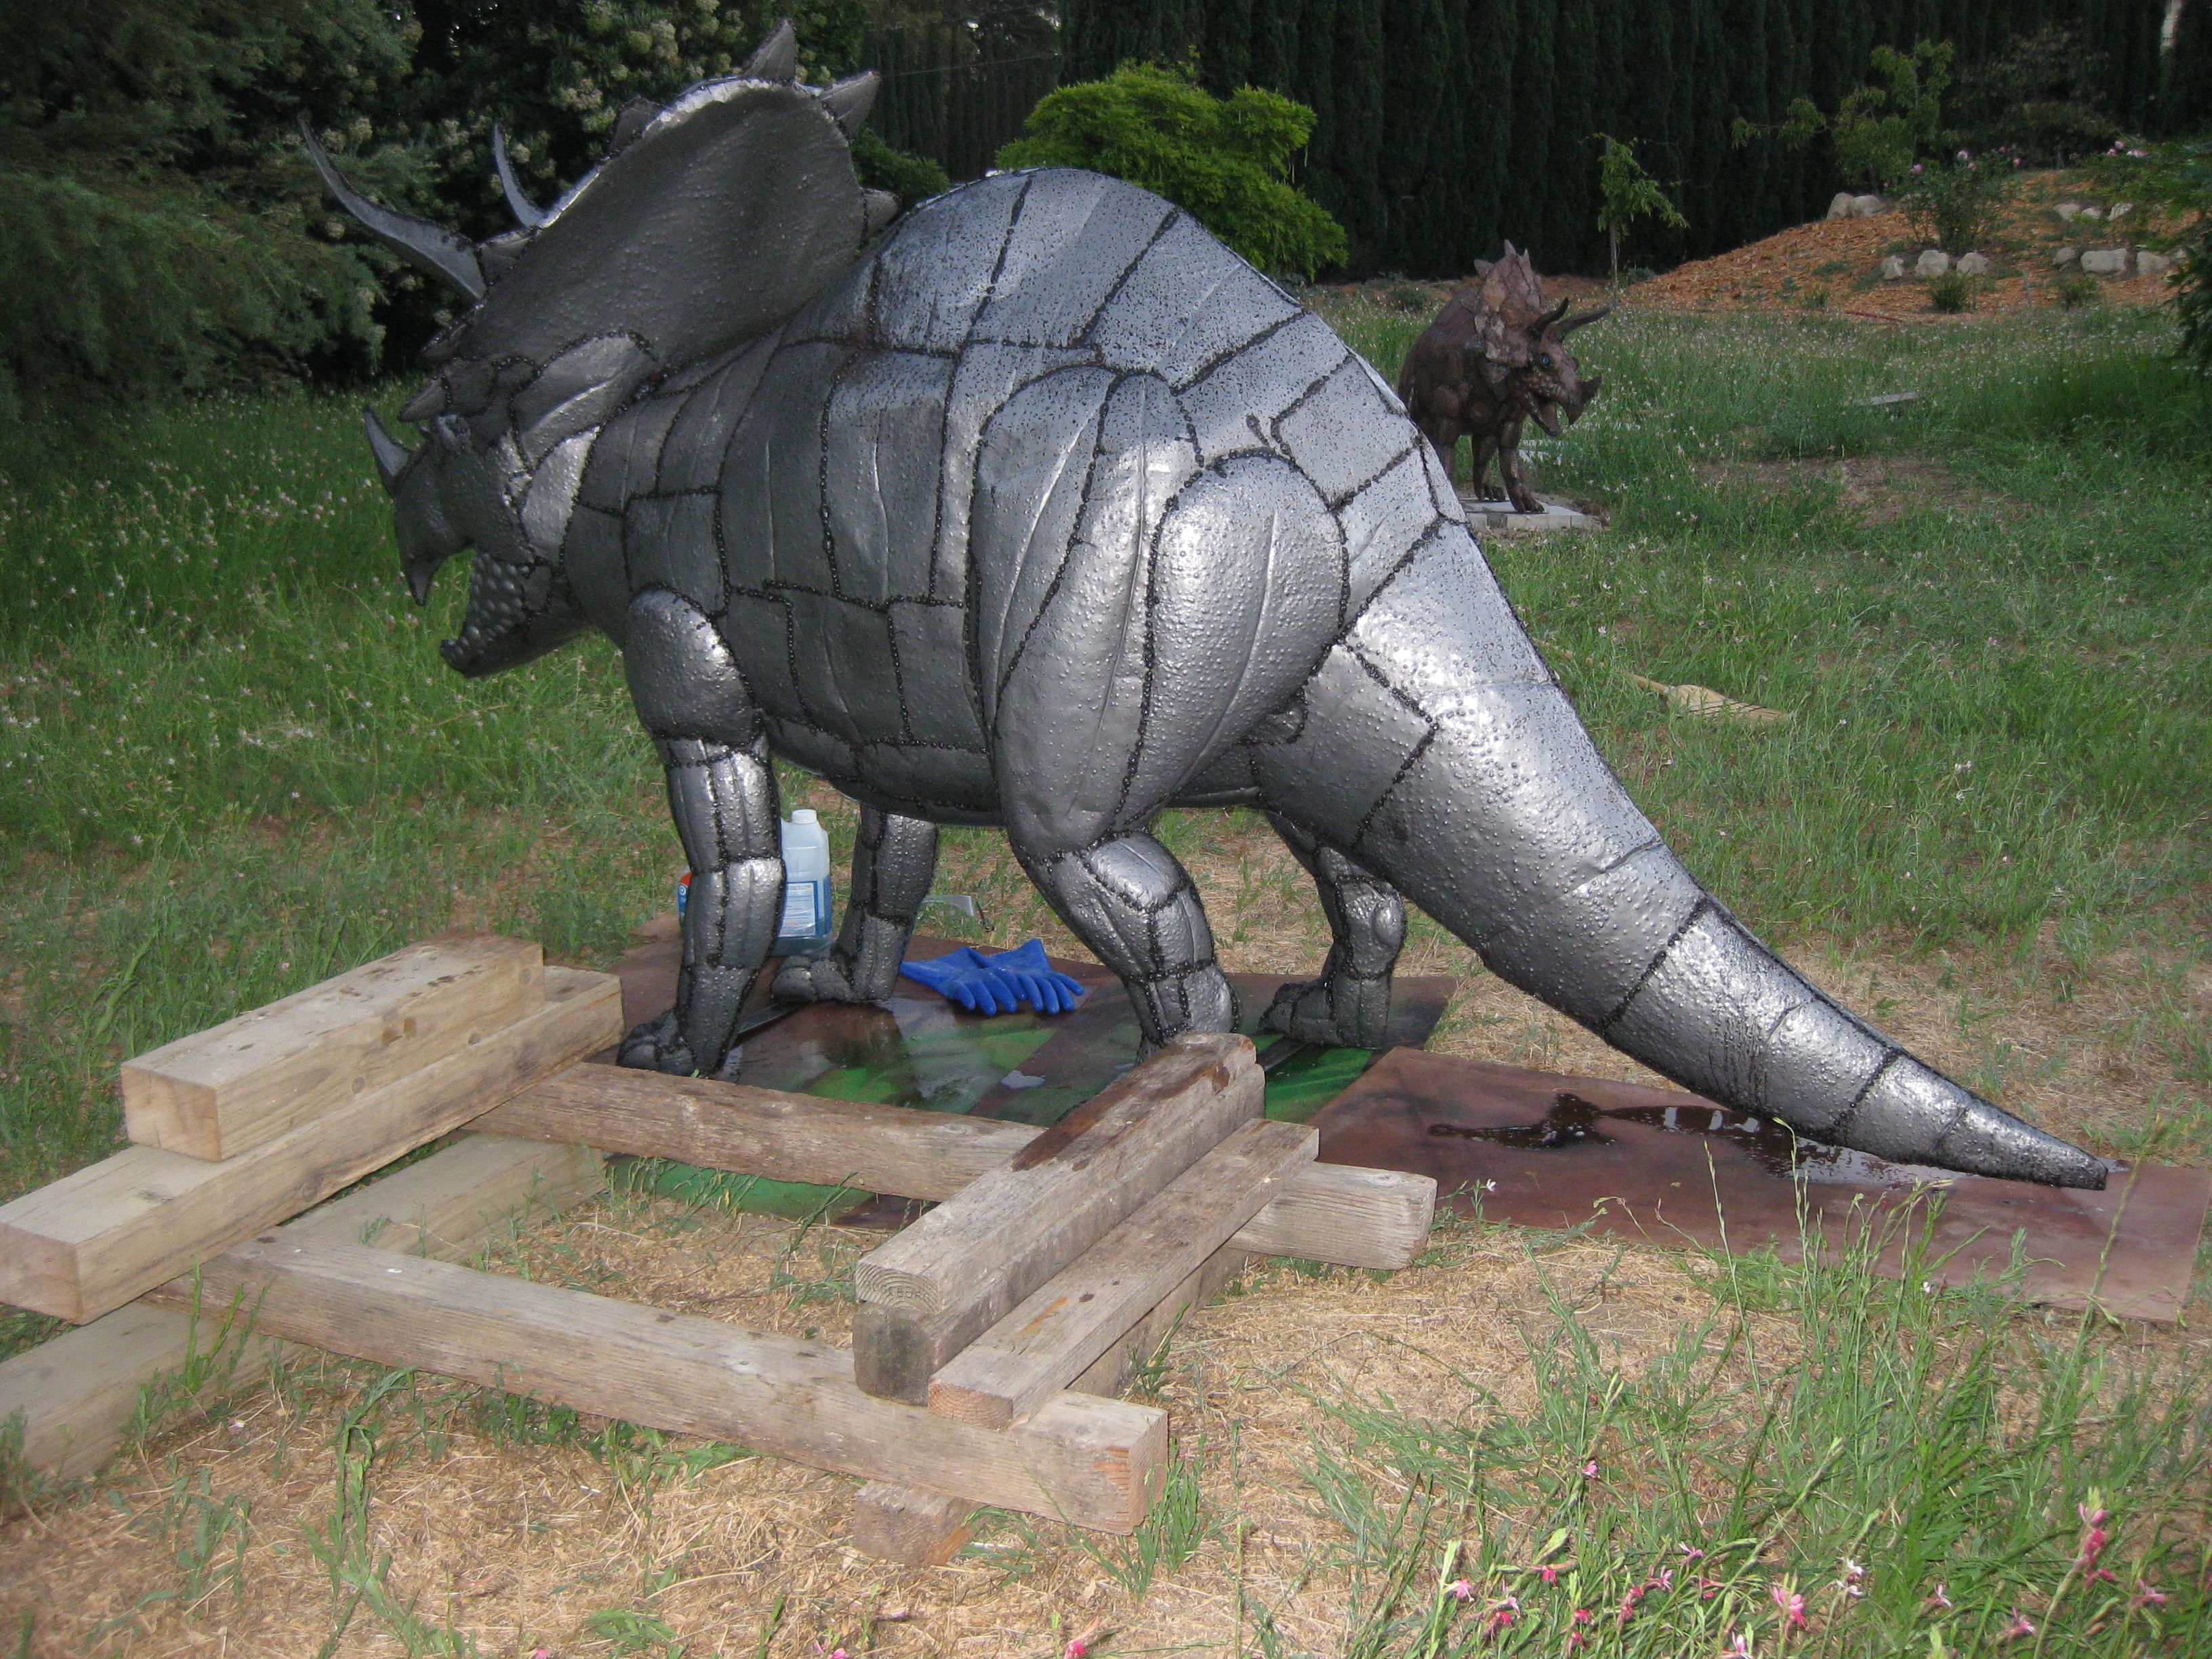
The picture below displays the materials you will need with the exception of a vacuum.
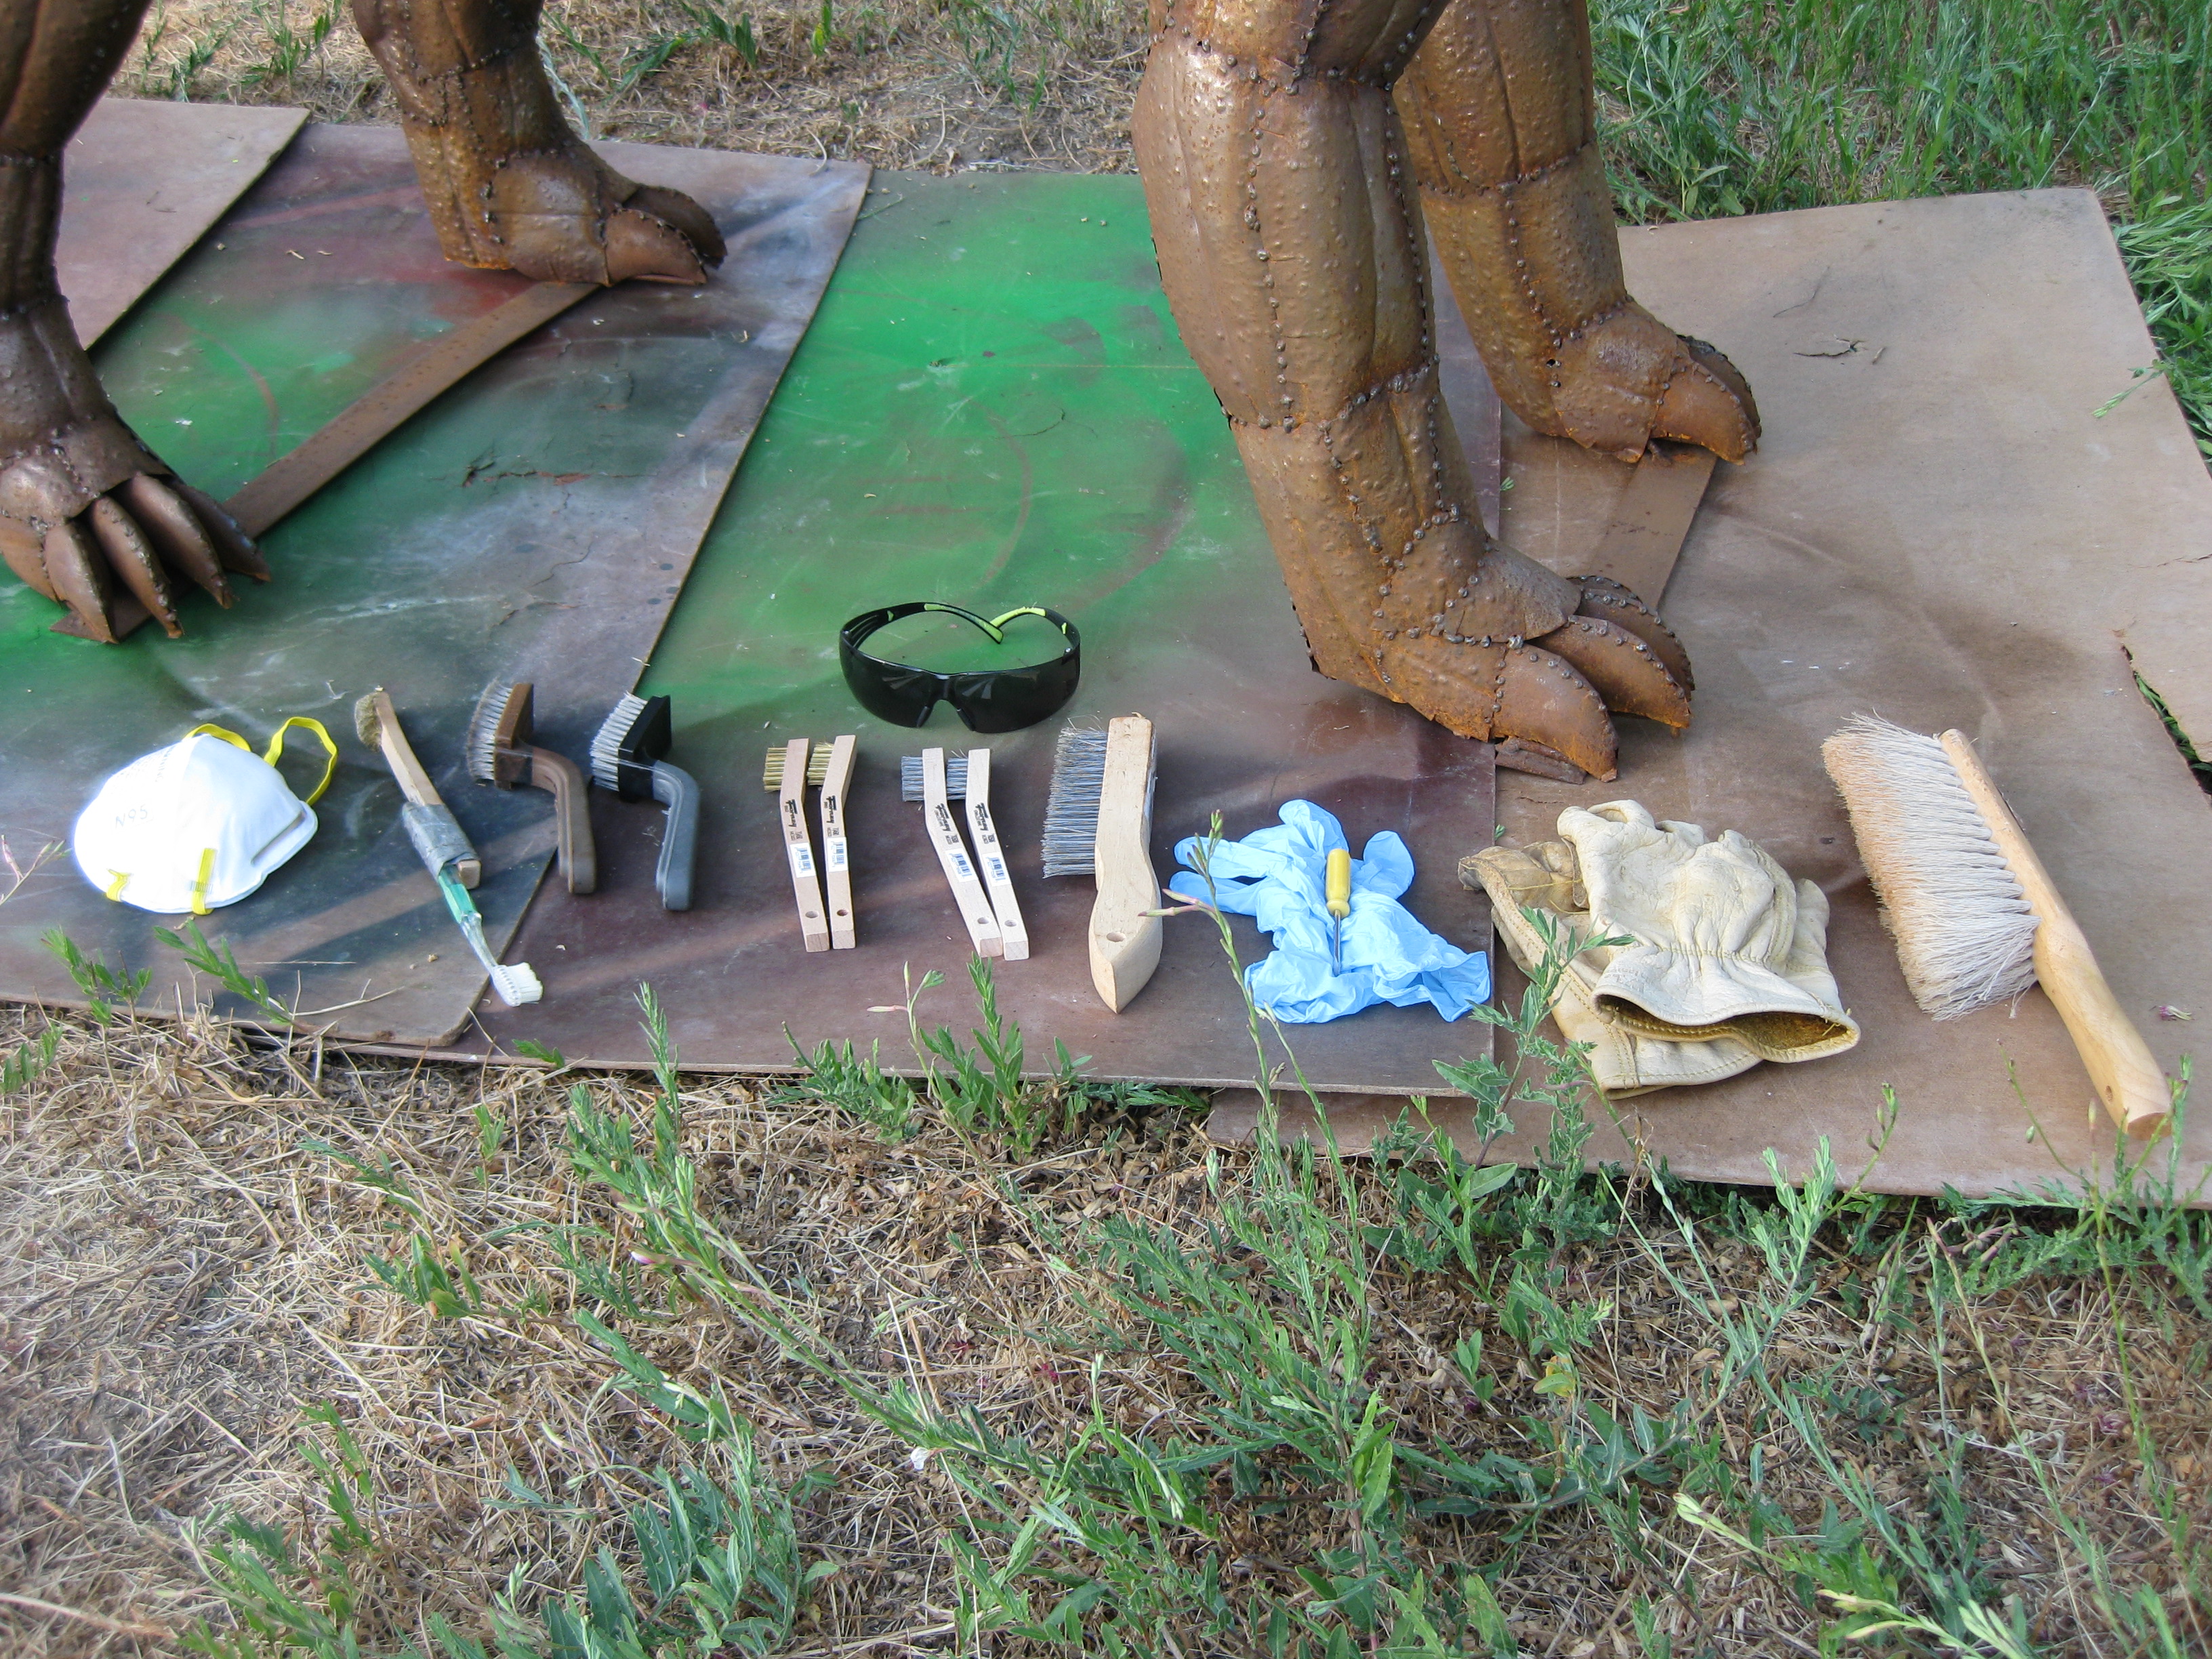
- Gloves – Work & Nitrile and Face Mask
- Hardboard, 4 X 4’s and/or 2 X 4’s, old towel
- Wire Brushes large & small and a Dusting Brush
The work gloves help protect your hands from sharp edges when moving your dinosaur. I find the Nitrile more comfortable while wire brushing. Eyewear & a Face Mask will aid in preventing the loose rust particles and dust from getting into your eyes and lungs. Better to be Safe! You will notice I taped a tooth brush to one of the small wire brushes. Two reasons 1) to extend the reach of the small wire brush for gaining access to areas in the mouth and inside the feet when you place your dinosaur on his side. 2) the tooth brush end helps remove spider webs in tight areas. The dusting brush for the final touch up before acid washing. It’s handy for regular cleaning of your dinosaur after it’s finished too.
The Hardboard provides you with a clean surface to lay your dinosaur on its side to access the inside of the feet and parts of the legs. You can get the hardboard in 4-foot X 8-foot sheets. For easy transportation in my car, the Home Center cut it into 4 pieces at no charge. Since your dinosaur is not square, having the sheet cut into pieces gives you flexibility to position the board to its needs. The 4 X 4’s or 2 X 4’s allow you to prop up your dinosaur to keep weight off more delicate areas. The towel(s) can be placed over the boards to provide padding for the same purpose.
A vacuum is great to remove bugs, dirt and other debris that find their way into various openings.
My Triceratops have plastic eye inserts. They are half spheres with vertical pupils. They give the appearance that the eyes are following you! Really Awesome!
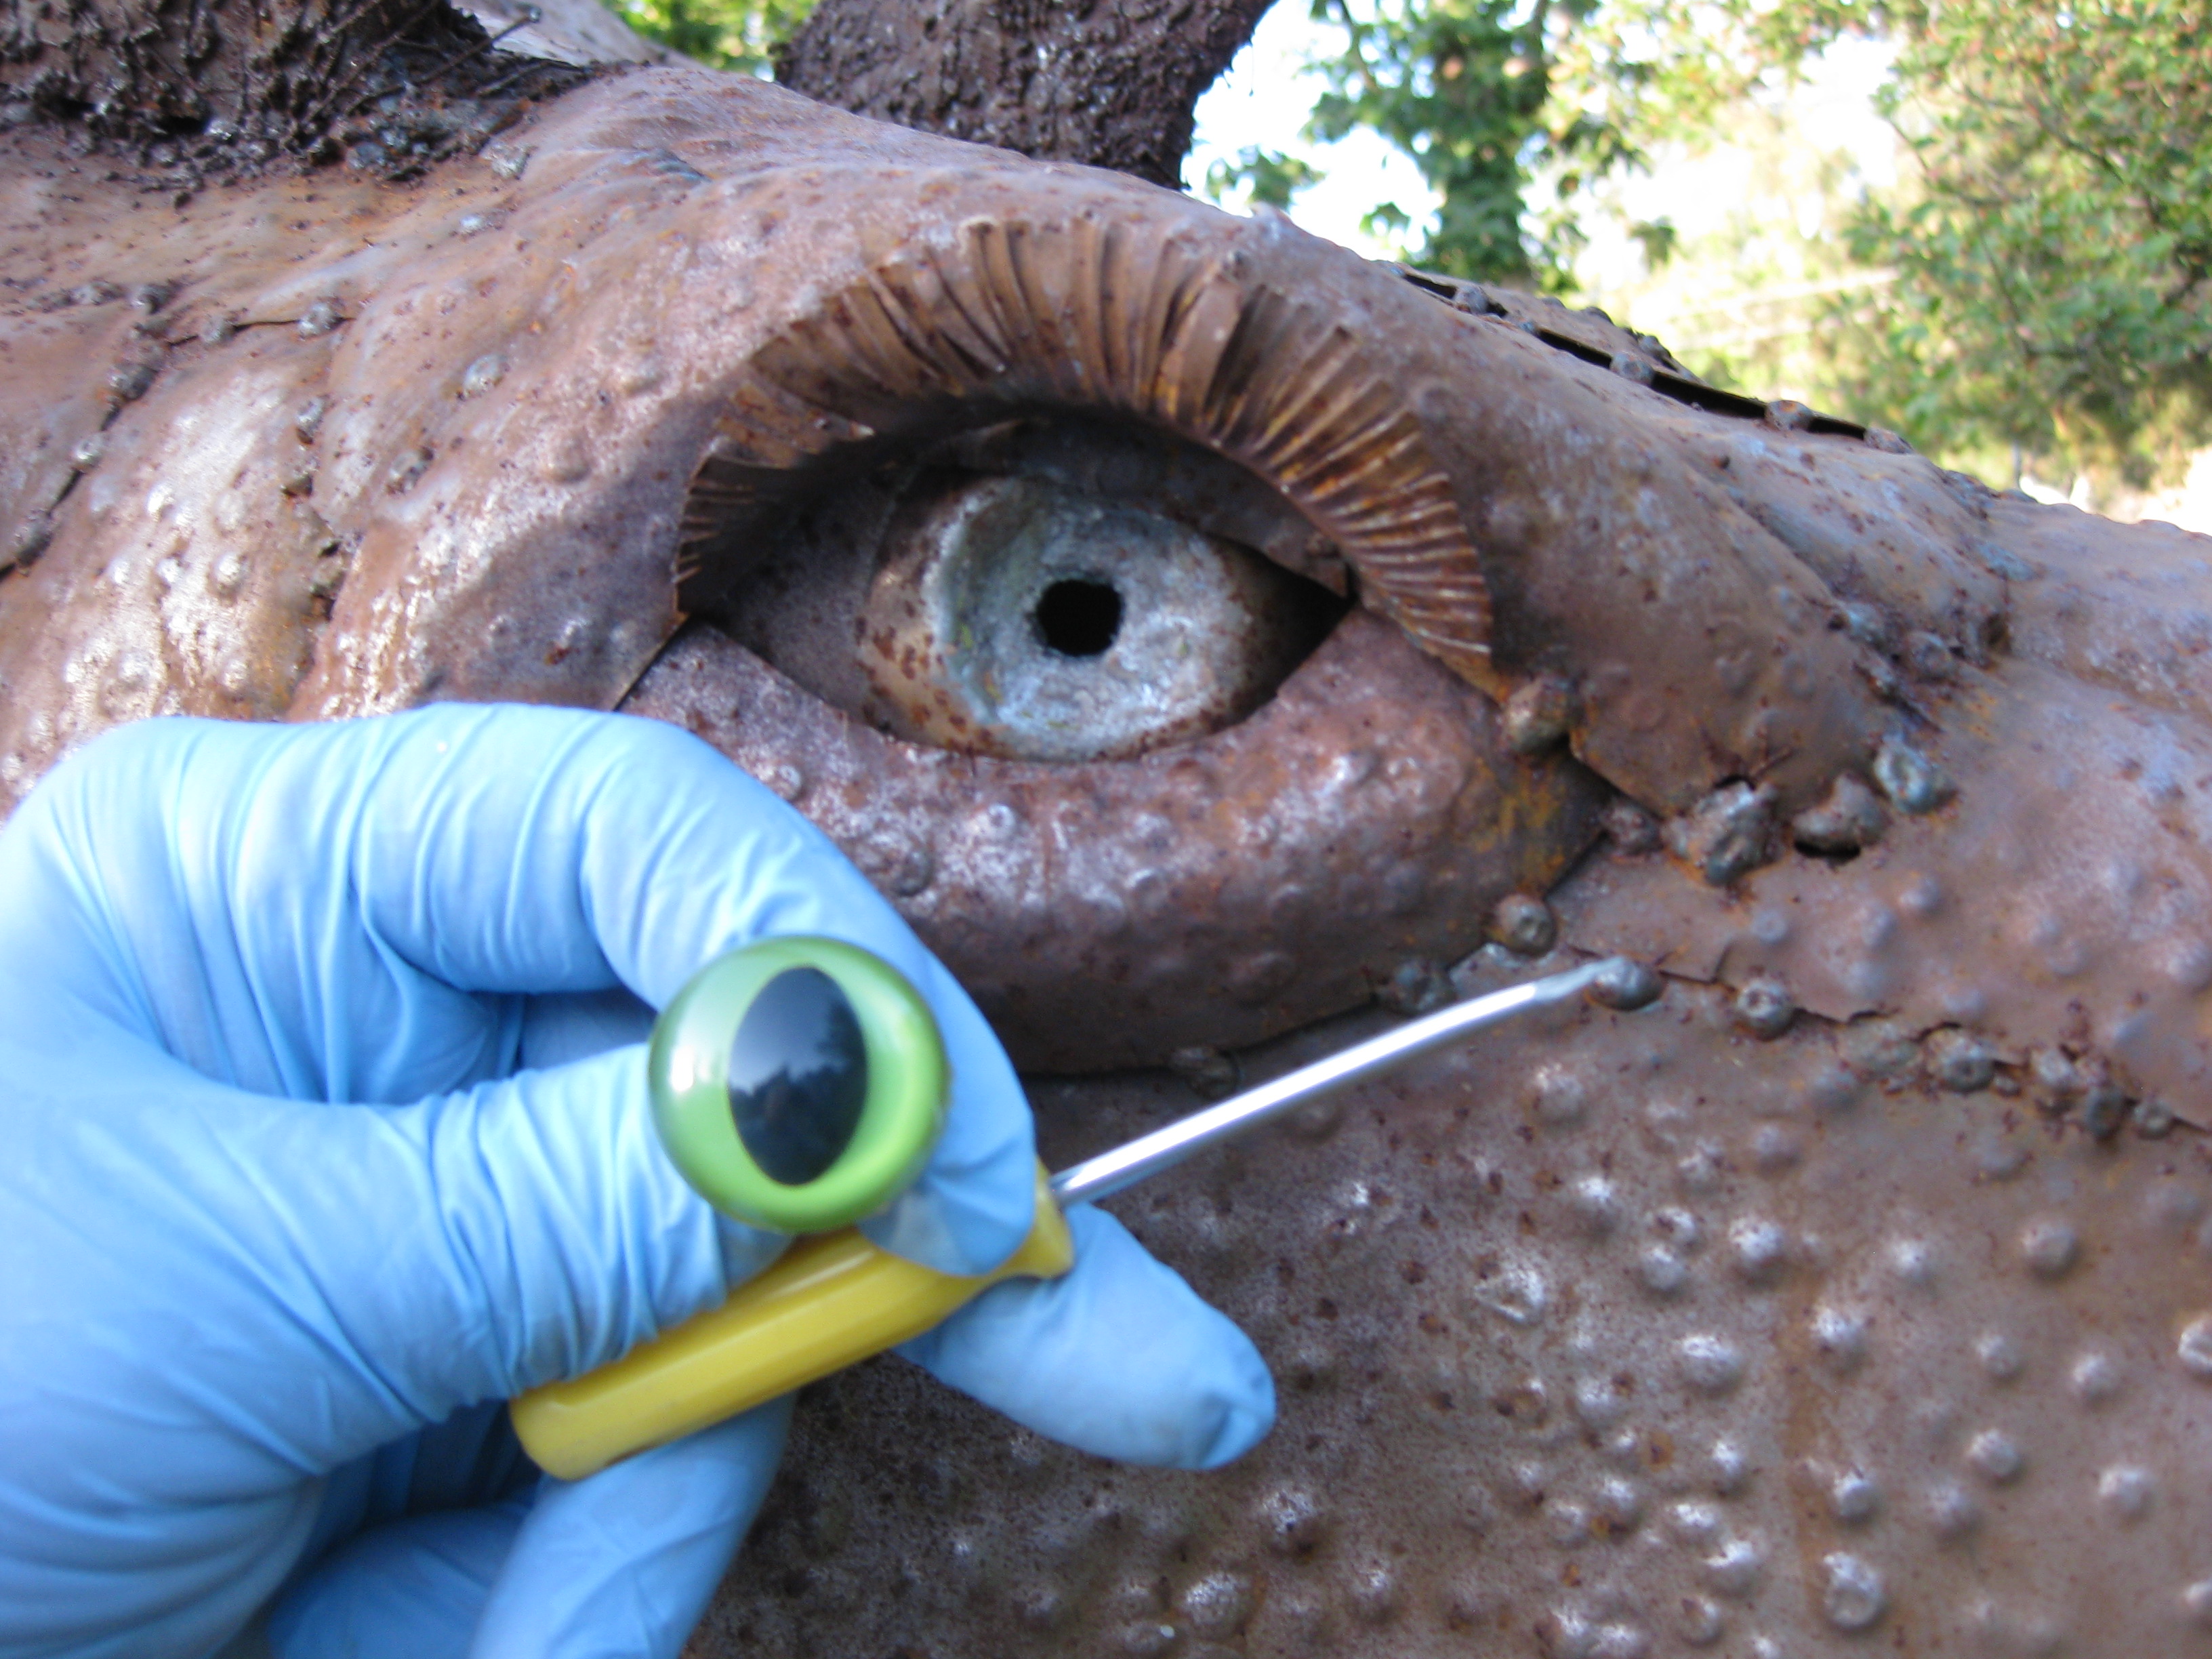
So, you should remove them before the wire brushing and especially before the acid washing. I suspect the Acid Wash will react negatively with the plastic. In addition, you can’t wire brush, rust convert or paint the socket setting with them in. Mine were set with silicone glue. I CAREFULLY used a very small screwdriver to loosen the eyes from the silicone glue. I put them in a safe place until the painting was complete and removed the remainder of the silicone glue from the eye sockets.
Ok, let’s get started. I use the large wire brush to remove loose rust from the easy access areas and the smaller for the details around the eyes, mouth, claws and feet. You don’t have to rub hard just enough pressure to get the rust build-up off. You’ll know based on your dinosaur’s condition. If you have a tall dinosaur like a Raptor or T-Rex, you may need a ladder. Be EXTREMELY CAREFULL when using a ladder on the GROUND! I was using a step stool to reach the top of the head on a Raptor and one of the legs shank into a gopher hole while I was standing on it! Yes, I fell and bent the stool, as well! I was lucky only a minor scrape and bruise to my ego. Those lousy gophers are not your friends.
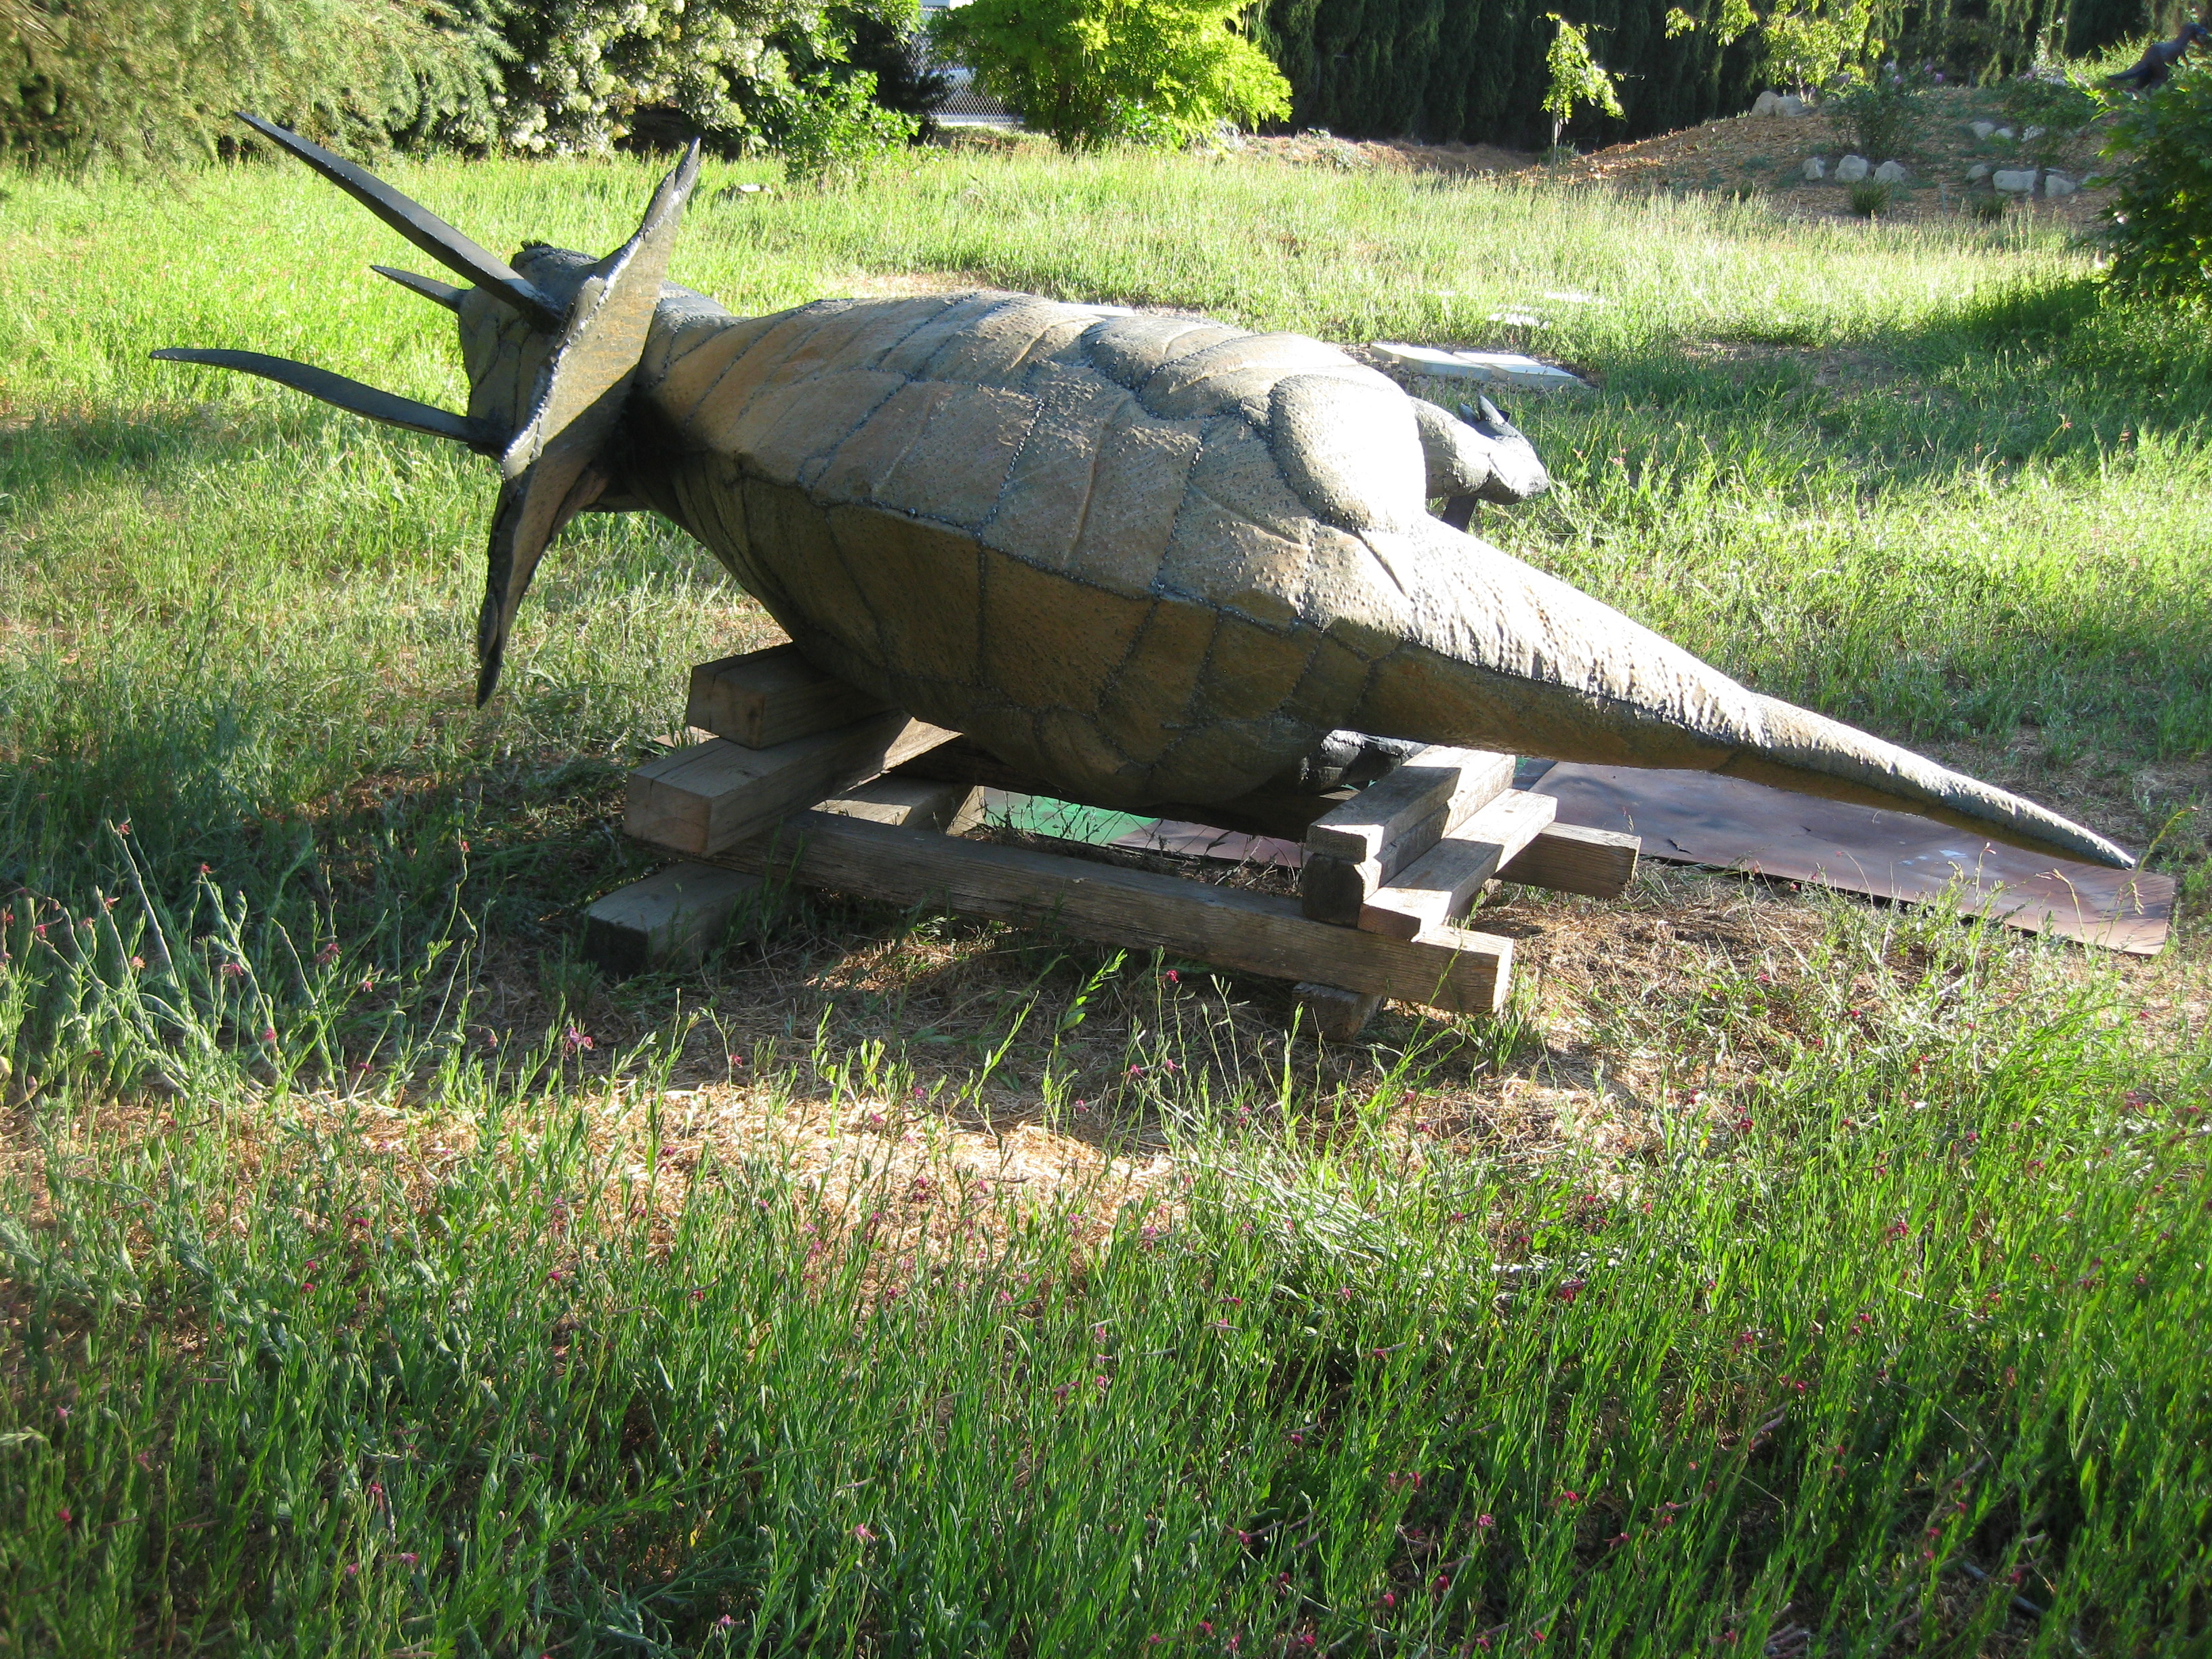
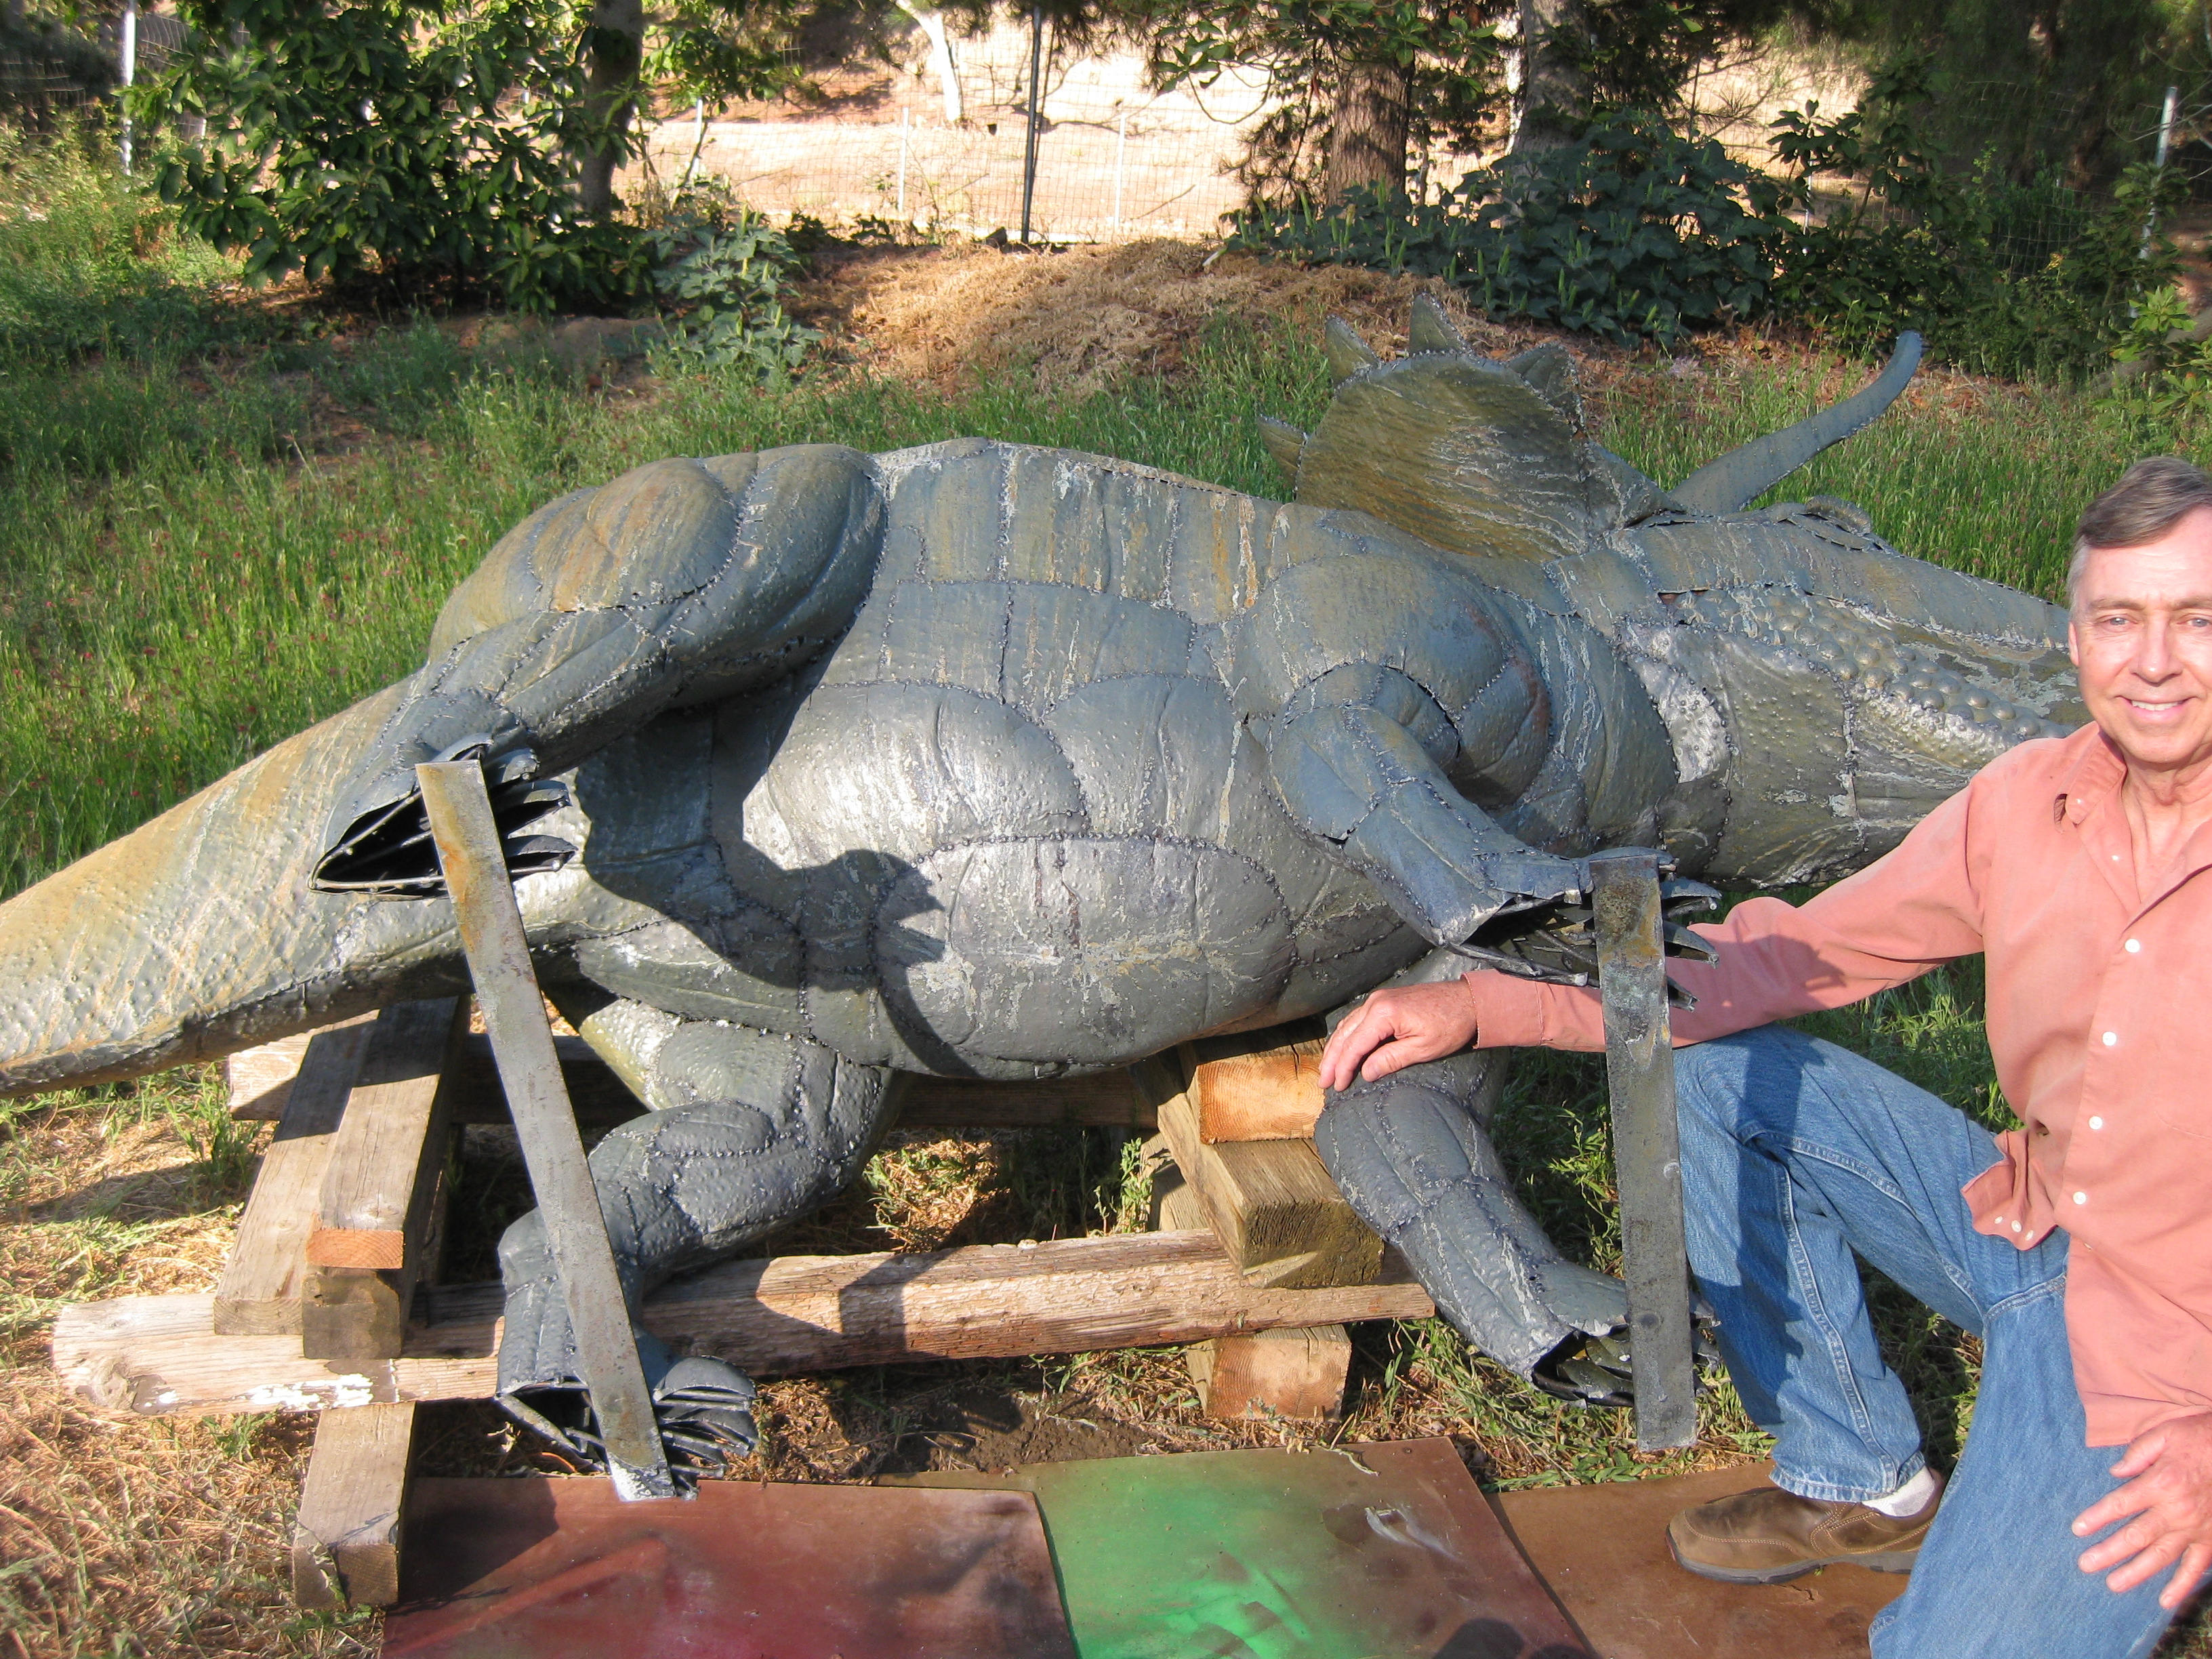
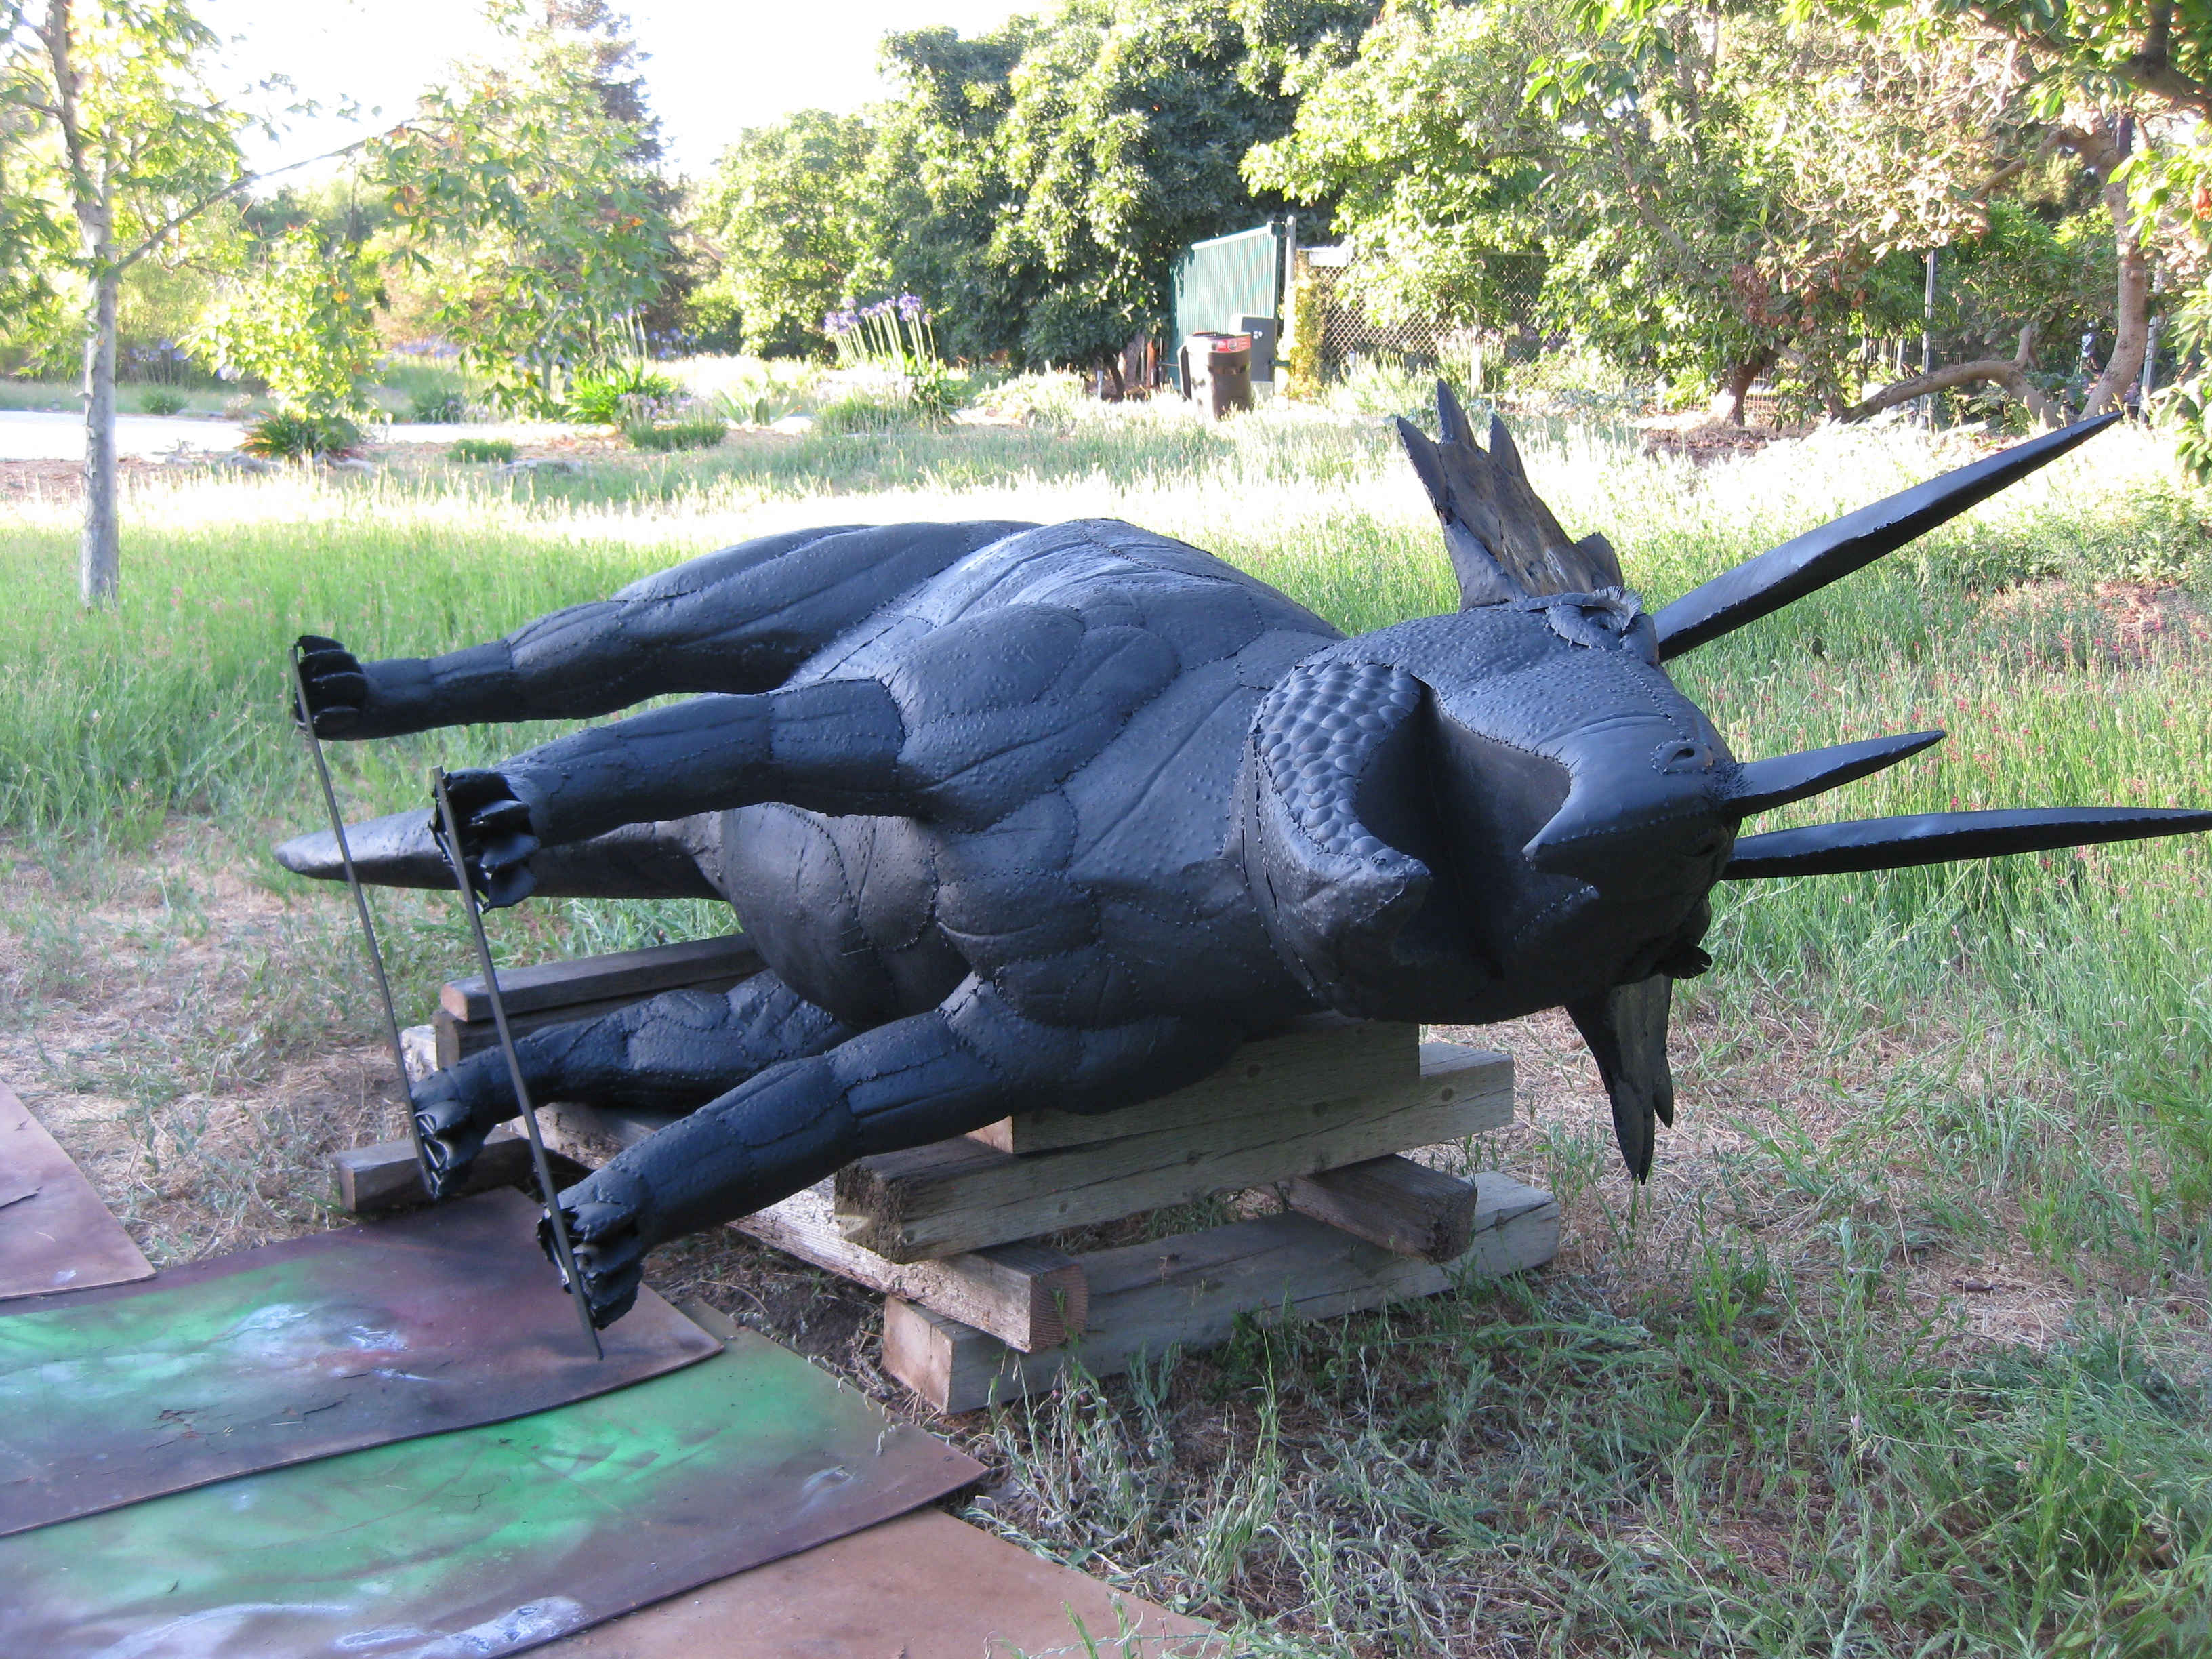
After you finish wire brushing all the areas of your dinosaur while it is in its usual upright position, use the dusting brush to clean up your work. I built a structure with 2 X 4’s & 4 X 4’s. I covered it with a number of layers of cloth to provide padding. Then CAREFULY and SLOWLY laid the Triceratops on his side on the platform making sure the shield around his head did not touch the boards or the ground. It provides easier access to the bottom of the feet and inside the legs. The platform will make it easier to paint the belly in future steps, as well.
Again, if you need someone to help you DON’T try this on your own. The worst thing you can do is drop your dinosaur! You could damage him and yourself!
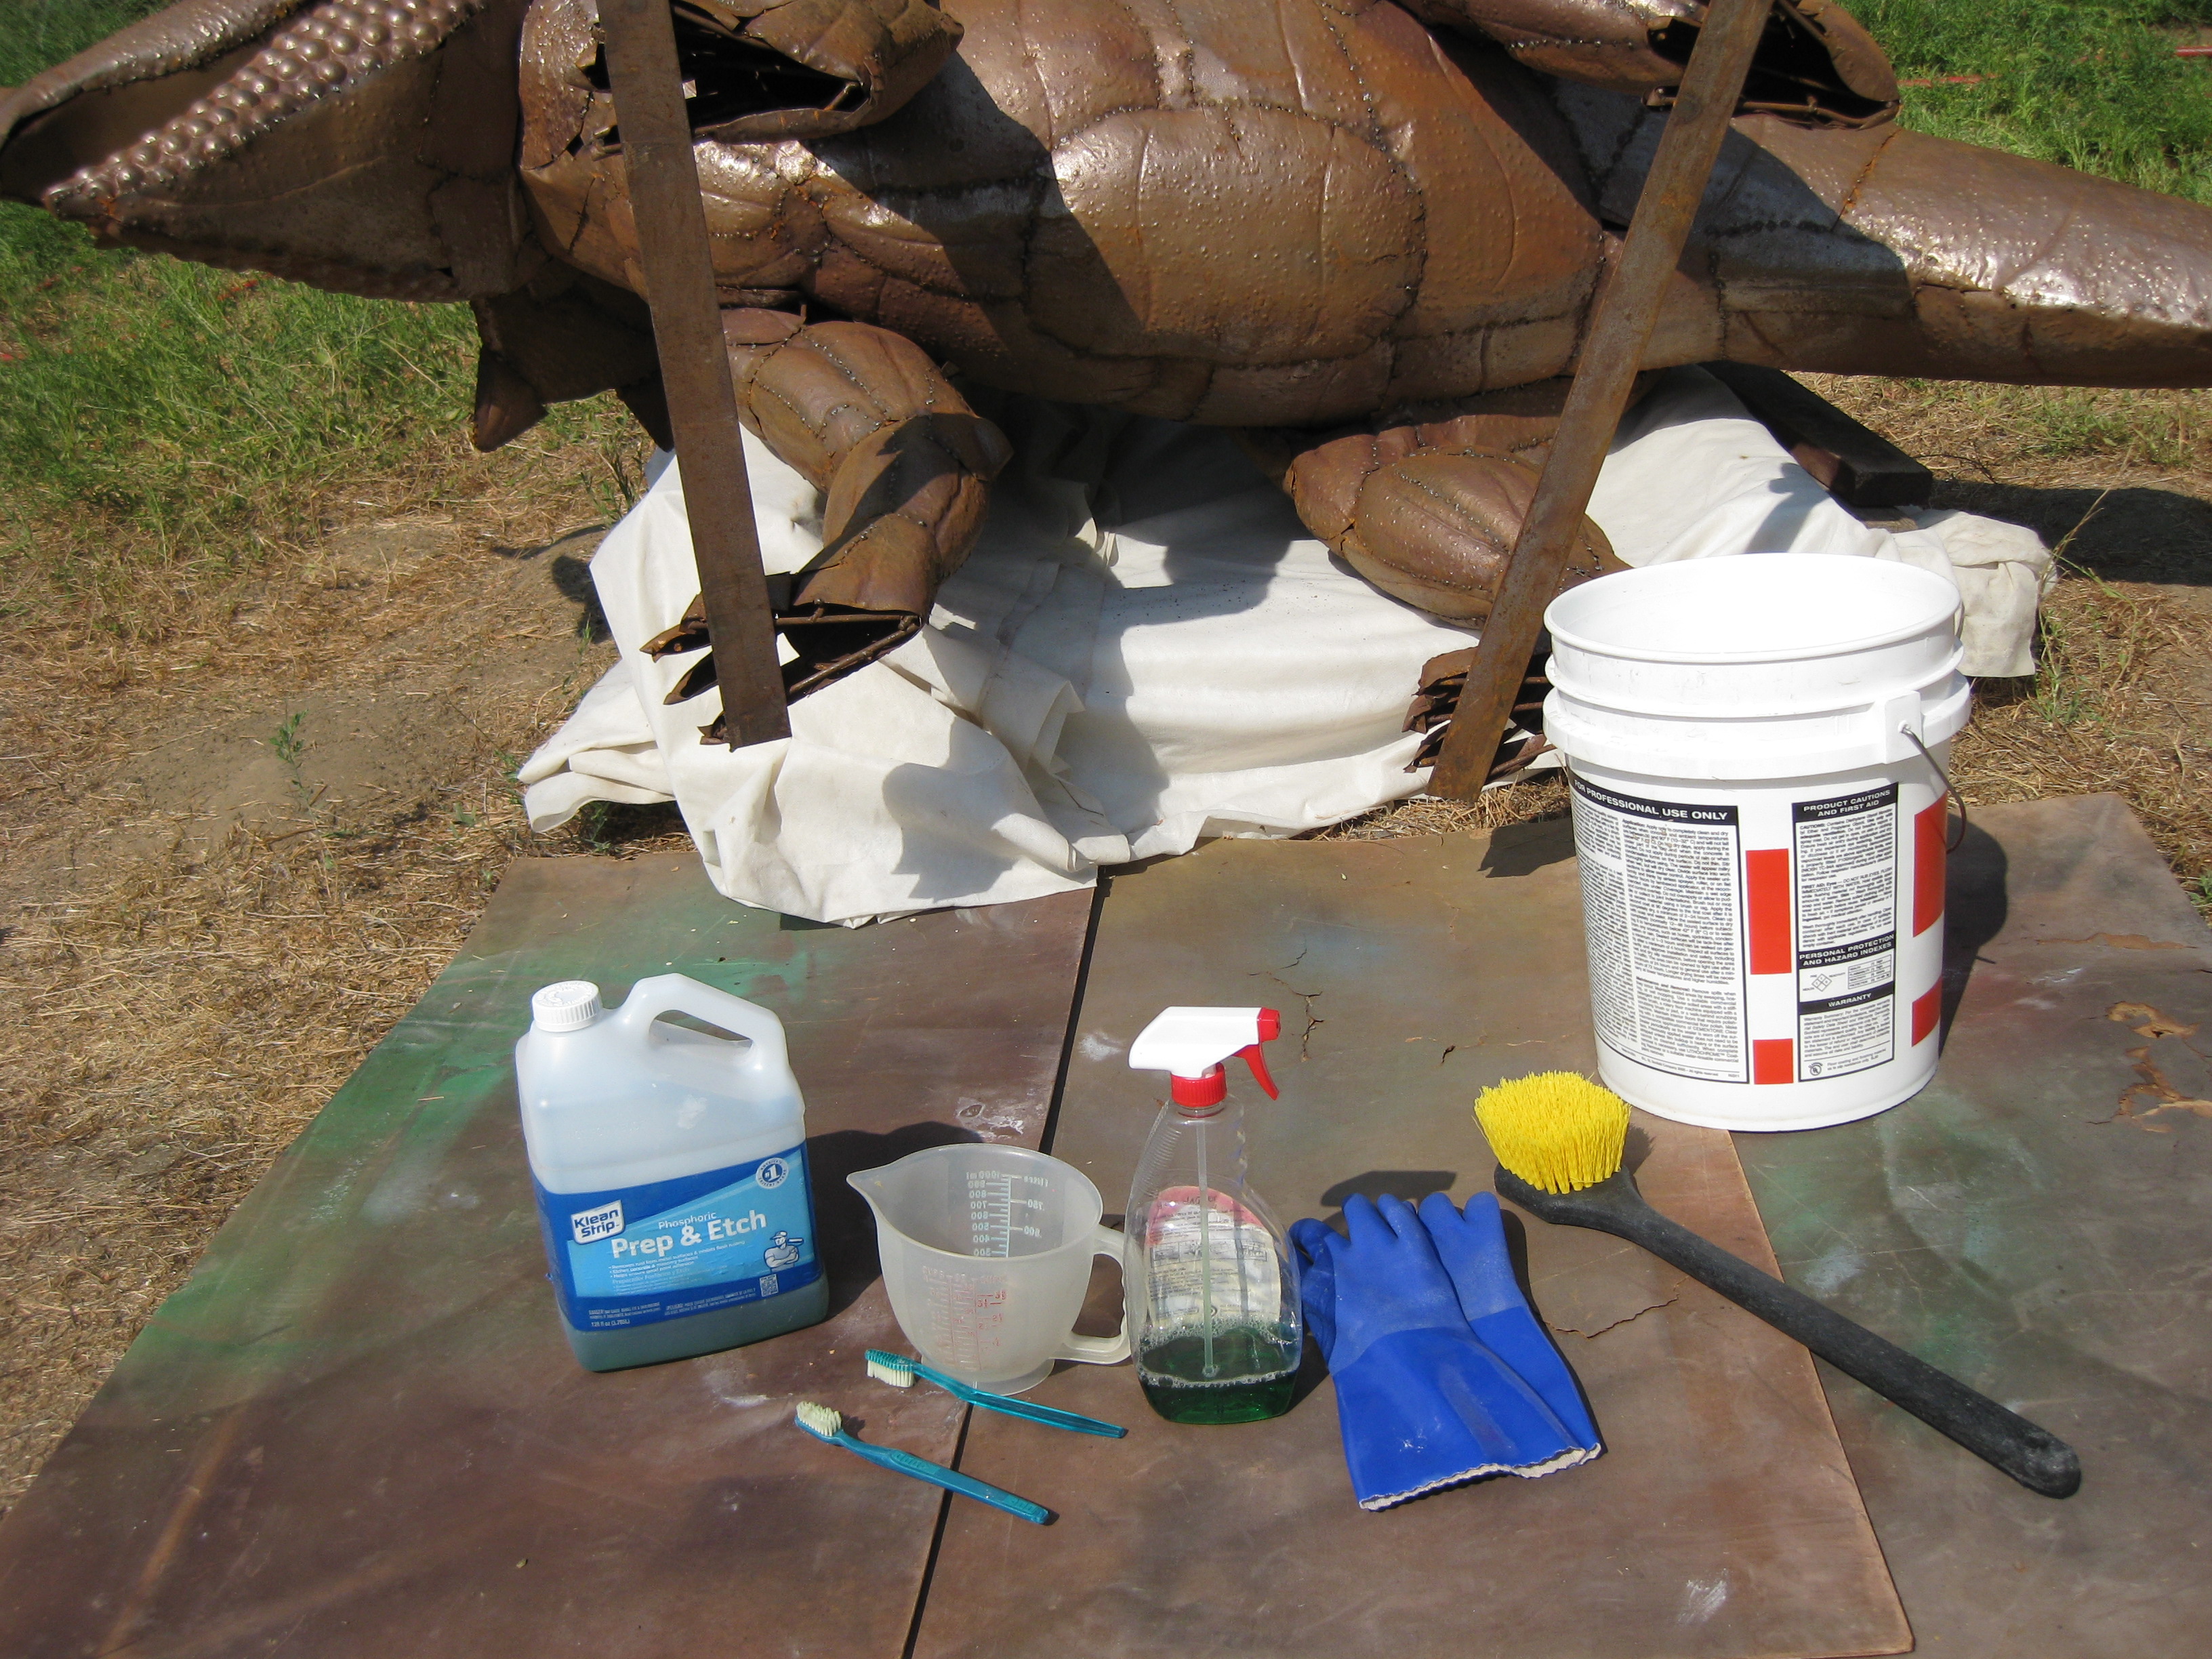
I was comfortable moving mine on my own and found the best position for me to lay the Triceratops on his side safely for both of us. After he’s down, you can get a good look at the bottom of his frame, feet and inside the legs. This will give the ability to vacuum and wire brush these areas before applying the acid wash. I would leave him on his side and spray acid wash on the bottom of frame & feet and as far inside the legs as you can before standing him upright.
Check with your Home improvement store regarding the acid wash material. Read the instructions for the Acid Wash carefully. Make sure you wear gloves to protect your hands and eyewear (not shown) that will guard against the Acid wash from getting in your eyes while spraying. A brush will help you with working the acid wash into the metal. I used an empty spray bottle to apply the acid wash. If you do not purchase a clean spray bottle, make sure you properly clean any empty bottle to ensure you don’t have a chemical reaction with and left over material in the bottle. Carefully clean up with water or recommended material per the acid wash instructions from the manufacturer. Your dinosaur will look like fresh metal after the wash is applied. Let set per the manufacturer’s instructions then rinse with water or manufacturers recommended material. I used a 5 gallon bucket to aid in conserving water.
 (
(
The acid wash I used changed appearance after it cured and was rinsed. You may like this look and wish to clear coat at this point.

After rinsing and your dinosaur has completely dried, it’s time to seal with a rust convertor/reformer. The spray I used converted any remaining rust to a primer and provided a flat black base coat. You may like this look and wish to seal with clear coat after this step.
Now Christopher is ready to primer and paint!
Your feedback is appreciated, Thank You.